Forget everything you thought you knew about making incredibly juicy, flavor-packed beer brats. The traditional two-step dance – simmering on the stove, then finishing on the grill – is officially a thing of the past. Prepare to unlock the ultimate secret to mastering beer brats with our revolutionary "no-stove" method. This technique not only streamlines your cooking process but also delivers brats so succulent and bursting with beer-infused flavor, they'll become the stuff of legend at your next backyard BBQ or tailgate party.
Hailing from the heart of Wisconsin, where beer brats are practically a food group, this grill-only approach ensures every bite is plump, tender, and perfectly charred, all while eliminating kitchen mess and ensuring maximum juiciness. Imagine sizzling onions caramelizing alongside your brats, all bathed in a robust beer broth, before getting that irresistible crispy snap directly over the flames. Ready to ditch the stovetop for good and achieve the best extra-juicy grilled beer brats of your life? Let's dive in.
Why the "No-Stove" Method Reigns Supreme for Extra-Juicy Beer Brats
For decades, the standard operating procedure for crafting delicious beer brats involved a stovetop simmer followed by a grilling session. While effective, this two-location cooking method often led to foggy kitchens, extra cleanup, and a fragmented workflow. The "no-stove" approach, beloved by grill masters and efficiency enthusiasts alike, consolidates the entire cooking process to one single location: your grill. This isn't just about convenience; it's about optimizing flavor and texture.
By conducting both the simmer and the grill finish on the same heat source, you allow the brats to absorb maximum beer and onion flavor in a continuous, consistent environment. The high heat of the grill is perfectly capable of both gently simmering and intensely charring, making it the ultimate multitasker. This method actively prevents the dreaded "burst casing" syndrome often caused by uneven cooking or transferring cold brats to a hot grill, ensuring your perfect beer brats remain plump and juicy from start to finish. The result? Extra-juicy grilled beer brats that boast an unmatched tenderness and a smoky, beer-infused depth that’s simply irresistible.
Gathering Your Arsenal: Ingredients & Tools for Grill-Only Beer Brats
To embark on your journey to grill-only brat mastery, you'll need a few key ingredients and the right equipment. Quality makes a difference, so opt for the best you can find.
Essential Ingredients:
- Raw Bratwurst: The star of the show! Look for high-quality, fresh, uncooked bratwurst. Butcher shop brats often offer superior flavor and texture. Avoid pre-cooked varieties for this method, as they won't absorb the beer bath flavors as effectively.
- Buns: Sturdy hoagie rolls or brat buns are ideal. You want something robust enough to hold up to a juicy brat and all its toppings.
- Beer: Typically, 3 standard cans or bottles of your favorite lager or pilsner are perfect. A lighter beer works well to infuse flavor without overwhelming the brat, but don't be afraid to experiment with amber ales for a richer profile.
- Sweet Onions: 3 medium-sized sweet onions, thinly sliced, will provide the foundational sweetness and aroma for your caramelized topping.
- Butter: 2 tablespoons of unsalted butter will help those onions achieve glorious caramelization.
Recommended Toppings & Pairings:
- Sauerkraut: A classic for a reason! Its tangy crunch cuts through the richness of the brat.
- Mustard: Spicy brown, whole grain, or Dijon mustard are all excellent choices. A squeeze of classic yellow mustard works too!
- Caramelized Beer Onions: The very onions you'll be cooking alongside the brats.
- Optional Toppings: Consider dill pickles, relish, sport peppers, or even a dash of hot sauce to personalize your brat experience.
- Beverage: An ice-cold beer (the same kind you used for simmering, perhaps?) is the quintessential pairing.
Necessary Tools:
- Deep Cast Iron Skillet or Dutch Oven: A robust, heavy-bottomed pan is crucial for conducting the simmer directly on the grill. A YETI Ranch pan or a similar heavy-duty grill pan works exceptionally well, ensuring even heat distribution and durability over direct flame.
- Grill: Any grill capable of sustaining medium-high direct heat will suffice. Charcoal grills offer a smoky depth, while gas grills provide precise temperature control.
- Long-Handled Tongs: Essential for safely handling hot brats and stirring onions.
- Instant-Read Meat Thermometer: Your best friend for ensuring the brats reach a safe internal temperature of 165°F.
Step-by-Step Mastery: Grilling Extra-Juicy Beer Brats from Start to Finish
This method breaks down into three simple, yet critical, phases, all executed on your grill. The beauty lies in its simplicity and the concentrated flavor it yields.
Setting the Stage: Grill Prep and Onion Sauté
First things first, get your grill ready. Prepare your grill for medium-high direct heat. This means placing your coals directly under the cooking grate if using charcoal, or setting burners to medium-high if using gas. You want a consistent, robust heat to get things cooking.
Place your deep cast iron skillet or Dutch oven directly on the grill grate. Add the 2 tablespoons of butter to the pan. Once melted and shimmering, add your thinly sliced sweet onions. This is where the magic begins! Cook the onions, stirring continually, until they reach your desired level of caramelization. This typically takes around 15-20 minutes. Don't rush this step; properly caramelized onions add a layer of sweet, savory depth that perfectly complements the beer brats.
The Beer Bath Immersion: Simmering for Supreme Juiciness
Once your onions have softened and begun to brown beautifully, it's time for the brats. Add the raw bratwurst directly to the pan with the onions. Then, pour in your beer, ensuring the brats are completely submerged. Depending on your pan size and the number of brats, this usually takes about three standard beers.
Bring the beer to a gentle simmer. Maintain this simmer, allowing the brats to cook slowly and evenly. This simmering phase is vital for infusing the brats with incredible flavor and ensuring they become incredibly tender from the inside out. Aim to simmer until the brats reach an internal temperature of 165°F, which typically takes around 20 minutes. However, for maximum tenderness and flavor absorption, many grill masters, including those from Wisconsin, prefer to simmer for at least 45 minutes, sometimes even longer. During this time, the brats are fully cooked and safe to eat, even before hitting the direct flame. This extended simmer is key to their "extra-juicy" designation!
The Grand Finale: Achieving Perfect Char and Golden Goodness
Once the brats have simmered to perfection, carefully remove them from the beer bath using tongs. Strain the onions from the beer and set them aside; these caramelized beauties will be a crucial topping later. You can discard the remaining beer broth.
Now, it's time for the final, satisfying sizzle. Place the fully cooked brats directly over the medium-high direct heat of your grill. The goal here is to achieve beautiful grill marks and a lightly charred, snappy casing without overcooking the interior or busting the skin. Turn and rotate the brats constantly, ensuring even charring on all sides. This phase is quick, usually just a few minutes per side, as the brats are already cooked through. Once you've achieved your desired level of golden-brown crispness and enticing grill marks, remove the brats from the grill and let them rest for a few minutes. This allows the juices to redistribute, ensuring every bite is as juicy as possible.
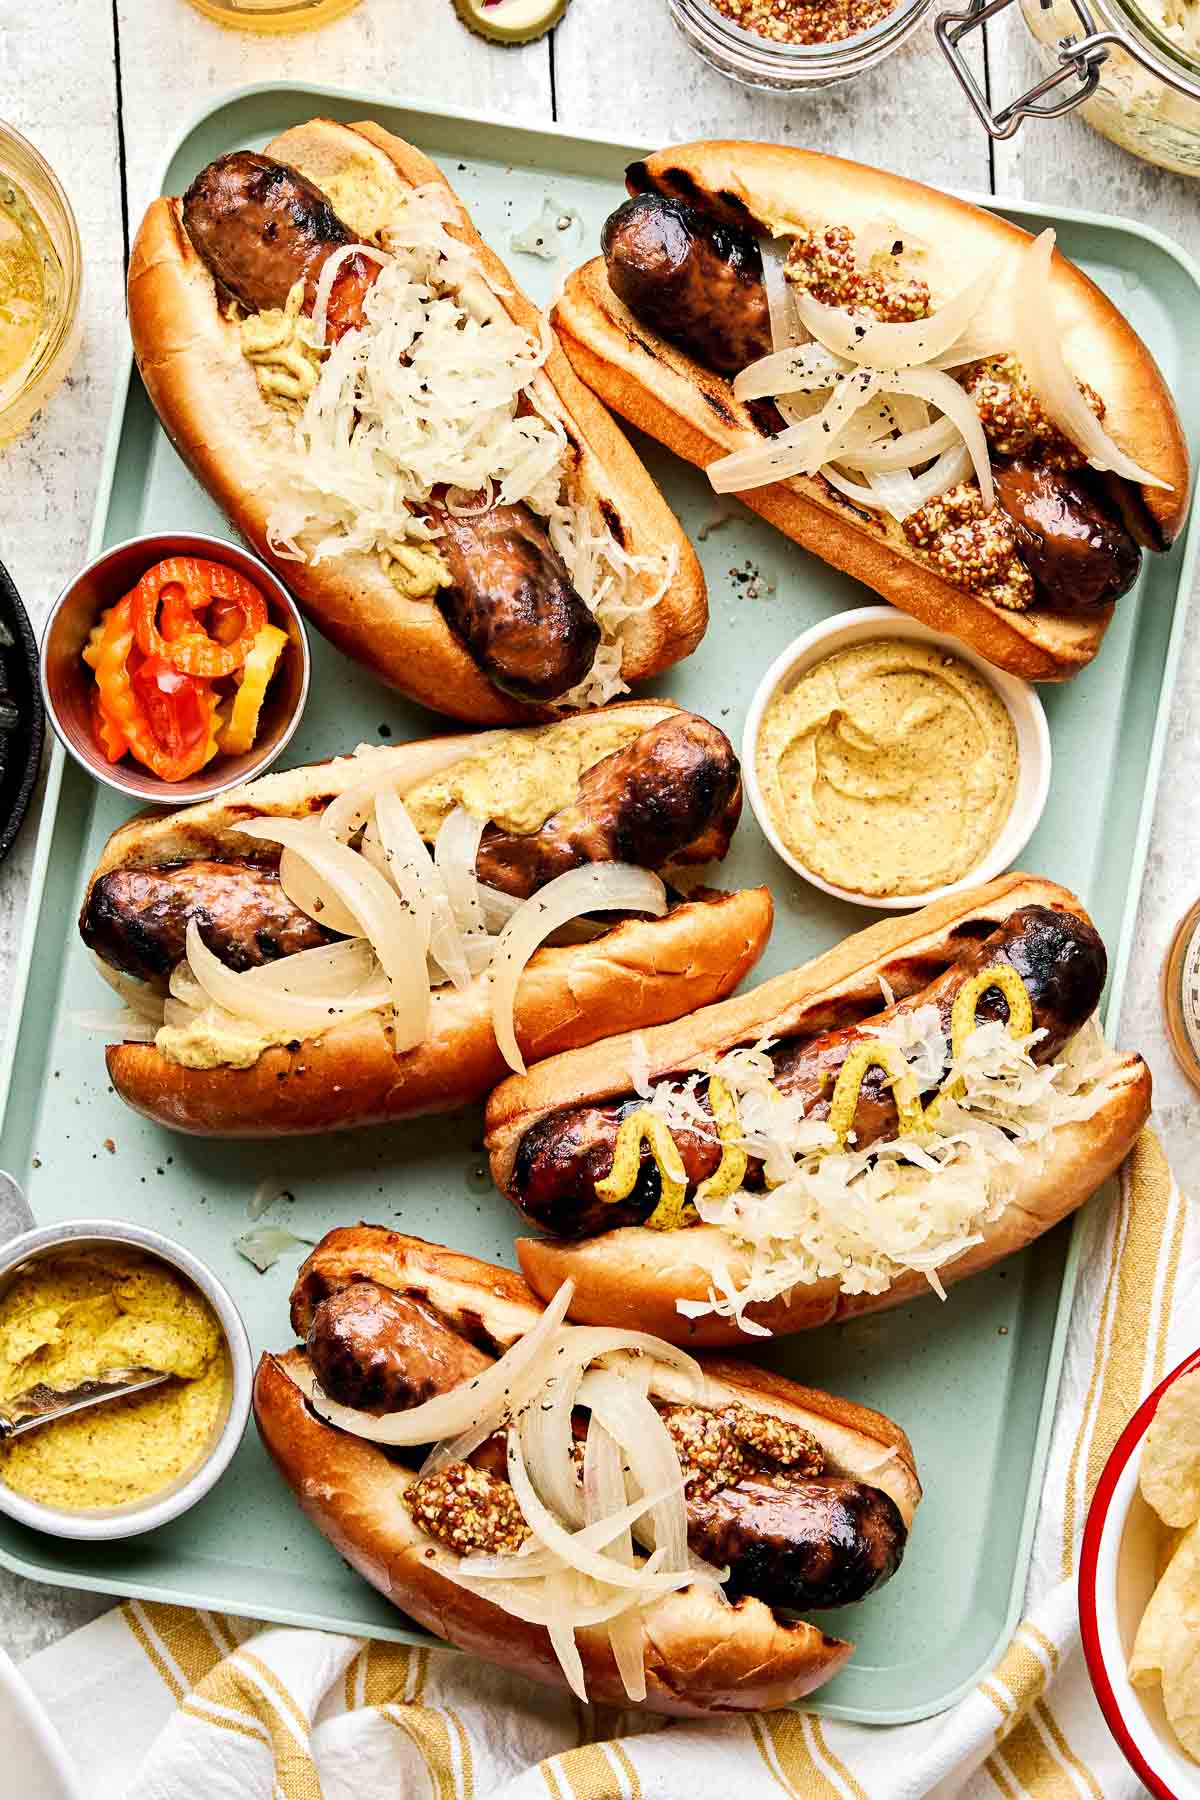
Elevating Your Beer Brat Experience: Toppings and Pairings
A perfectly cooked beer brat is a canvas for delicious toppings and ideal pairings. The experience extends beyond the grill.
The Classics Reign Supreme: Pile your perfectly grilled brats onto a sturdy bun. Generously spoon the caramelized beer onions you prepared earlier over the brat. Add a heap of tangy sauerkraut and a generous squiggle of your favorite mustard. This trifecta creates a symphony of flavors and textures that is truly unmatched.
Beyond the Basics: Don't be afraid to get creative! Consider adding a creamy coleslaw for a cool crunch, a zesty relish for extra tang, or even a sprinkle of crumbled crispy bacon. For those who love a bit of heat, sliced jalapeños or a fiery mustard can really kick things up a notch.
Perfect Pairings: What goes better with beer brats than an ice-cold beer? Stick with a crisp lager or pilsner to complement the rich flavors, or explore a local craft brew. For non-alcoholic options, a classic root beer or a sparkling cider makes for a delightful refreshment.
Whether you're hosting a massive tailgate party, celebrating Oktoberfest in your backyard, or simply enjoying a summer evening meal, these extra-juicy grilled beer brats are guaranteed to be a crowd-pleaser. The "no-stove" method not only simplifies the process but truly elevates the flavor, making you the undisputed king or queen of the grill.
Embrace the simplicity, savor the juiciness, and enjoy the rich, beer-infused flavor that only this grill-only method can deliver. Your taste buds, and your guests, will thank you!
